
This guide takes you from scratch to having your first sign loaded and your first work order scheduled. If you already know the module and are looking for the detail of a specific screen, go straight to Signs.
Inside the system, in the Signs console, the View the guide button opens this same explanation on screen and marks which step you are on. You can close it and go through the module on your own whenever you want.
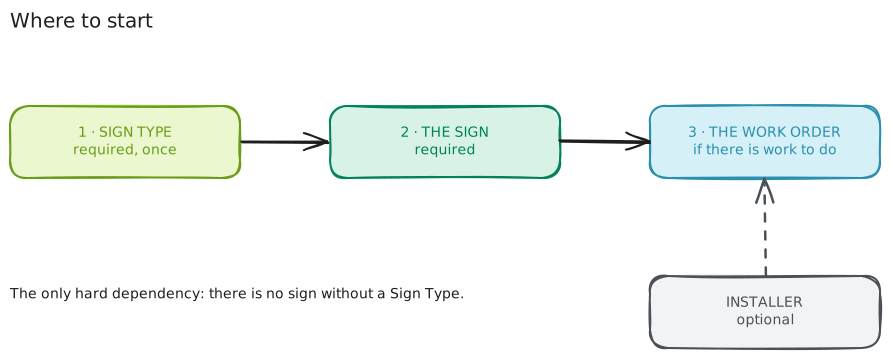
There are three steps, and only the first one is required before anything else
1. Create a Sign Type (Model)
Before adding a sign, the system asks you for a Sign Type — which on screen you will also see as Model. It is the class of sign you use: "1×2 metal sheet with logo", "small vinyl banner".
Think of it as the make and model of a car: it is defined once and serves every identical sign. Then each physical sign has its own code, which would be the license plate.
A Sign Type is defined with:
- Name (required)
- The Operation it advertises: sale, rental or seasonal rental
- Dimensions, optional
It is created from Inventory → Models button, or from the on-screen guide. See the detail in Sign Types (Models).
2. Load your signs
From the inventory, New sign button. Each sign needs:
- The Sign Type it belongs to
- A unique code that you define (for example A-102)
- Optionally: a description, the owning branch, and a photo
And above all: where it is today. A new sign goes into the warehouse by default, but you can indicate that it is at a branch, at the workshop, or already placed on a property.
If a sign is already installed, load it that way directly. There is no need to invent a work order to reflect something that already happened.
See the detail in New sign.
3. Schedule a work order, when needed
This step is optional. You only need it when someone has to physically go and do something: install a sign, remove it, or move it from one property to another.
From the console, New order button. You choose the type of work, the sign, the property, and optionally the date and the installer.
If you assigned an installer, when you are done you can notify them right there: they get an email with the work order and a link to see it in full, without needing to have an account.
See the detail in Schedule an installation, removal or move.
Move or schedule: which one to use
There are two ways to change where a sign is, and they serve different purposes:
| When | Effect | |
|---|---|---|
| Move | the change already happened and you are just recording it | immediate |
| Schedule an order | the work has not been done yet and needs to be coordinated | stays pending |
The step most often forgotten: confirming
Scheduling an order does not move the sign. The order stays pending until someone confirms that the work was done.
Only when you confirm it does the sign move to the property (if it was an installation or a move) or return to its storage location (if it was a removal), and that movement is recorded in its history.
You can confirm —or cancel— from the console's work order schedule, without going anywhere else, or from the order's page.
If the work was not done, cancel the order instead of confirming it: the sign does not move.
When the property is no longer being marketed
If a property is sold, rented, suspended or unpublished and still has a sign installed, the console warns you with a yellow alert, listing the signs in that situation.
The system does not schedule the removal on its own: removing a sign is physical work and someone has to go. The alert warns you; the decision is yours.
Support
If you have any difficulty with this help article, you can report a problem by clicking here