
This guide will teach you how to manage your website console, enabling you to make changes to the information it displays.
Manage Your Website
Overview
This panel centralizes all the management tools for your website:
- Domain configuration
- Generate QR codes to share your websites
- Content management (featured properties, pages, blog)
- Visual customization (design, colors, social networks)
- AI Chat for automated 24/7 customer service
- Branch office configuration
- Lead capture forms
- Advanced integrations
Site Information
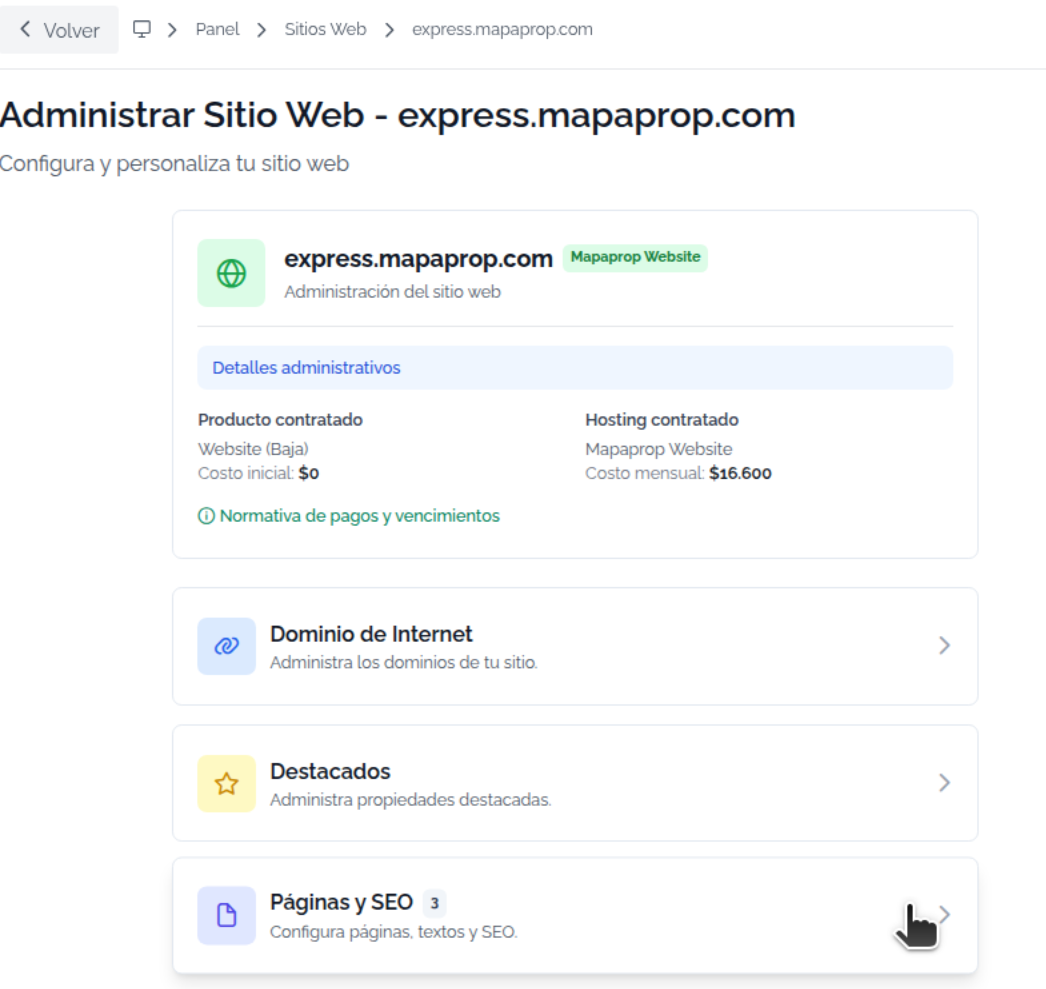
At the top you will see the details of your website:
| Information | Description |
|---|---|
| Domain | URL where your site is published |
| Plan | Subscription type (Website, Pro+, Business, Website+) |
| Status | Active, Legacy Hosting, etc. |
Administrative Details
If you expand the administrative information, you will see:
- Contracted product: Plan that includes the website with its initial cost
- Hosting: Hosting service with its monthly cost
- Regulations: Link to payment and billing documentation
Legacy Hosting
If you have a previous plan (Legacy Hosting), you will see a yellow notice with the following characteristics:
- Website functioning: Your site remains active normally
- Limited features: Some new configurations are not available
- Recommendation: Upgrade to a current plan to access all functionalities
Features not available in Legacy Hosting:
- Blog
- Custom design
- Social networks
- I Want to Sell form
Content Configuration
Internet Domain
Configure the domain where your website will be published:
- Own domain: Connect your custom domain (e.g.,
www.yourdomain.com) - SSL Certificate: Automatically included for secure connection
- DNS: Necessary record configuration
- Propagation: Wait time 24-48 hours
How to connect your domain?
- Click on "Internet Domain"
- Enter your custom domain
- Configure DNS records according to instructions
- Wait for DNS propagation
- SSL certificate is generated automatically
QR Code for Your Website
Generate a custom QR code to share your website quickly and professionally.
What is the QR code?
The QR code is a scannable image that allows your clients to access your website directly from their mobile phones without needing to type the URL.
How to Generate the QR Code
From your site administration panel:
- Click on "Real Estate QR" in the options menu
- The QR code generator will open
- Select your website domain or enter a custom URL
- Preview the generated QR code
- Click "Download" to save the image
The QR code downloads in high-quality PNG format, ready to print or share digitally.
QR Code Uses
| Use | Description |
|---|---|
| Business cards | Add the QR to your business cards |
| Printed materials | Include it in brochures, flyers, property signs |
| Storefront | Place it in your office so clients can access quickly |
| Events | Share it at real estate fairs and exhibitions |
| Social networks | Post it on your profiles to drive traffic to your website |
Generator Options
The generator allows you to:
- Select website: If you have multiple sites, choose which one to use
- Custom URL: Enter any domain manually (with or without www)
- Preview: Verify how it will look before downloading
- Direct download: Save the QR to your device instantly
Featured Properties
Manage the featured properties that appear on your website:
- Quantity: Shows how many properties you have featured
- Selection: Choose which properties to display on the homepage
- Order: Organize how they are displayed
- Update: Automatically syncs with your inventory
Pages and SEO
Manage the content of your site pages:
- Institutional pages: About Us, Services, Contact, etc.
- Meta tags: Title and description for SEO
- Google Analytics: Tracking code
- Search Console: Property verification
- Page counter: Shows how many pages you have configured
Advanced Configuration
Design
Customize the visual appearance of your website:
- Colors: Brand color palette
- Logo: Your real estate agency image
- Typography: Text fonts and sizes
- Styles: Buttons, cards, layout
Not available for Legacy Hosting. Requires current plan (Website, Pro+, Business).
Social Networks
Connect your social profiles with your website:
- Facebook: Profile or business page
- Instagram: Your real estate agency username
- Twitter/X: Official account
- LinkedIn: Professional profile
- YouTube: Video channel
- WhatsApp: Direct contact number
Icons will automatically appear on your website with links to your profiles.
Not available for Legacy Hosting.
AI Chat (Featured)
Mapaprop Chat AI is an intelligent assistant that handles inquiries on your website 24/7:
What Does AI Chat Do?
- Answers questions about properties, services and contact
- Filters properties according to client preferences
- Captures leads by saving contact information
- Records complete conversations in your Inbox
- Works 24/7 without manual intervention
AI Chat Configuration
In this section you can:
- Activate/Deactivate the chat on your site
- Customize welcome messages
- Configure assistant behavior
- View usage statistics
Token Consumption
- Each conversation consumes AI tokens from your plan
- Tokens renew monthly according to your subscription
- You can view consumption at AI Services
- Compatible with plans: Plus, Pro+, Business
Advantages:
- Immediate attention to potential clients
- Lead capture outside business hours
- Consistent and updated information
- Complete conversation history
Branch Offices
Configure your real estate agency branches that will appear on the site:
- Add branches: Name, address, phone, email
- Maps: Location on Google Maps
- Hours: Public service hours
- Managers: Agents for each branch
Branches appear on the "Contact" page of your website with all updated information.
I Want to Sell Form
Capture form for property owners who want to sell or rent:
- Activate/Deactivate on your site
- Customize form fields
- Notification email when inquiries arrive
- CRM integration: Leads are automatically saved
Form fields:
- Property type
- Operation (sale/rental)
- Location
- Owner information
- Additional comments
Premium function: Requires Pro+ or higher plan. Not available for Legacy Hosting.
Blog
Manage your real estate agency blog:
- Create articles: News, tips, real estate market
- Manage posts: Edit, publish, unpublish
- Images: Featured photos for each article
- SEO: Meta data for positioning
- Post counter: Shows how many articles you have published
Blog advantages:
- Better SEO positioning
- Industry authority
- Content for social networks
- Client education
Not available for Legacy Hosting.
Integrations
Connect external tools with your website:
- Google Analytics: Traffic tracking
- Facebook Pixel: Remarketing on Facebook
- Google Tag Manager: Script management
- Custom scripts: Third-party codes
- Webhooks: Advanced integrations
Navigation Between Sections
Each panel card is clickable and takes you to the specific configuration:
- Click on any card → Opens the corresponding section
- Back button → Returns to the main panel
- Auto-save → Changes are saved automatically
Frequently Asked Questions
Can I change the domain after configuring it?
Yes. You can change the domain at any time from "Internet Domain". The change may take 24-48 hours to propagate.
What happens if I have Legacy Hosting?
Your site continues functioning normally, but you will not have access to new features (Blog, Design, AI Chat, etc.). We recommend upgrading to a current plan.
How do I activate AI Chat?
You need a Plus, Pro+ or Business plan. Then, from the "AI Chat" section, you can activate and configure it. Each conversation consumes AI tokens from your monthly plan.
Can I have multiple sites?
Your plan includes 1 site. If you need more sites, you can purchase Website+ addons from Manage Websites.
Are changes saved automatically?
Yes. Most configurations are saved automatically when you modify them. Some sections have an explicit "Save" button.
Tips
- Complete your profile: The more complete your site is, the better the client experience
- Use AI Chat: Serve clients 24/7 without manual intervention
- Optimize SEO: Complete meta tags on all pages to improve positioning
- Connect Analytics: Measure traffic from day one
- Update featured properties: Keep current properties on the homepage
- Consistent blog: Publish articles regularly to improve your authority
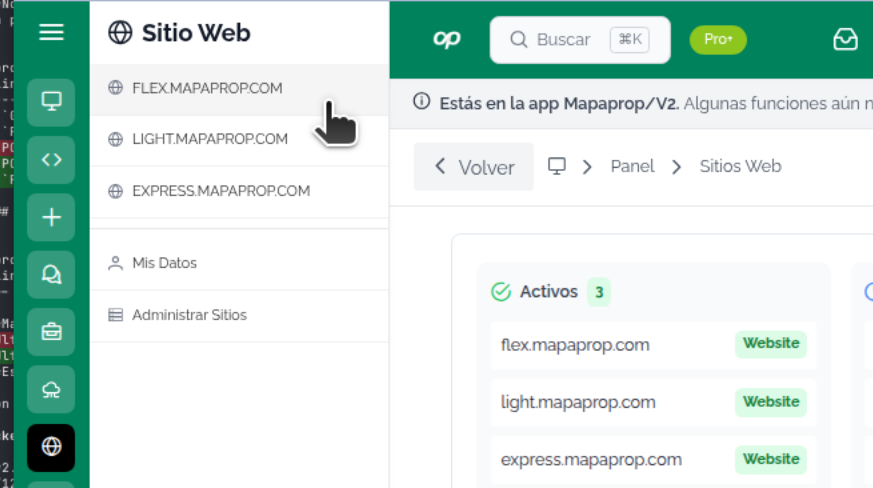
To access the general administration console of your website, click on Menu > Website > Your website domain
You can also access from Manage Websites
Self-Service Website Functions
The available administration options allow you to access and manage the following functions:
- Manage Internet Domain
- Generate QR Code for Your Website
- Edit Featured Properties
- Manage Pages or Sections and SEO
- Blog > Manage Publications
Then you can…
- Edit Edit Website Design (Colors, Images)
- Manage Social Network Links
- Manage Mapaprop AI Chat for Website
- Manage Branch Office Configuration on Website
- Form Sell Form / Property Capture
- Website Integrations